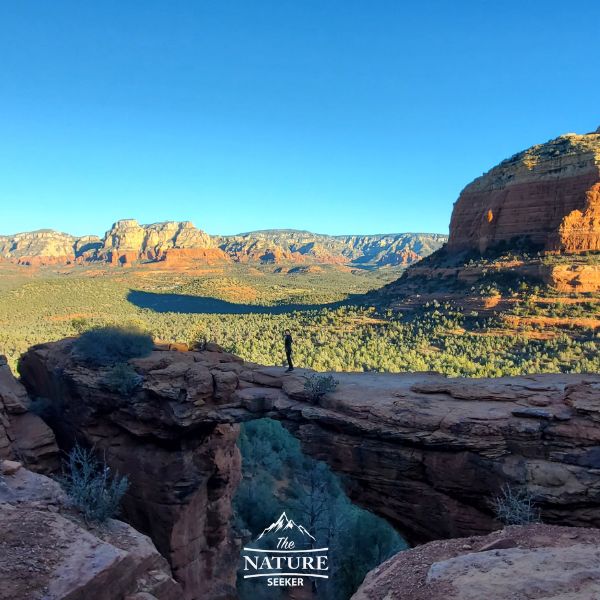
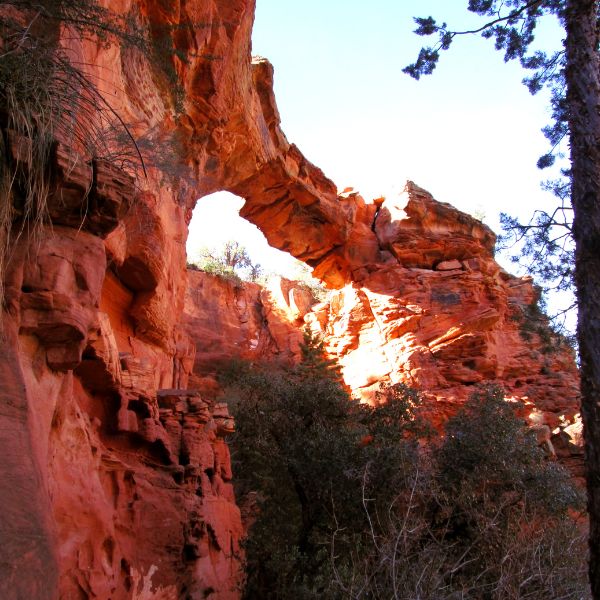
How to Hike to Devils Bridge in Sedona (Beginner Guide)

It’s no secret that the Devils Bridge Sedona hike is extremely beautiful (and crowded) and if you’re planning on trying it out, I want you to have the best experience possible and that’s why I’m going to share 8 things you need to know to do that.
I personally learned these 8 things after I did the Devils Bridge Sedona trail and I guarantee you that they’ll help you when you hike here too.
Quick info on the Devils Bridge Sedona hike:
- Name: Devils Bridge (also known as Devils Arch).
- Location: Sedona.
- Distance: 6-8 miles in and out but there are different ways to hike there and I’ll show you all the options.
- Difficulty: Moderate.
- Dangerous? Not really.
- Easy to get lost? No, very easy to find/navigate.
- Rating: 4 out of 5.
- Recommended hike? Yes!
If you can get here without the crowds (I’ll explain how), then definitely do this hike once. But if you can’t, don’t let it worry you since there are much better hikes in Sedona to explore that are also close (I’ll show you which ones to look for).
Everything you need to know before you hike Devils Bridge trail:
These tips are going to cover timing, alternative paths to reach Devils Bridge and basically how to have a massive advantage against the 99% of other people who come here (they just don’t know these things).
1) These are the best times to start the Devil’s Bridge Sedona hike:
- As early as possible (I’m literally talking daybreak, get there at 6-7 am).
- Ideally visit this place between December-February (less crowds).
I’m strongly going to recommend you follow those 2 tips and here’s why: One of the worst things Sedona is known for are the crowds and considering that Devils Bridge is one of the most popular hikes there, you’ll likely see a lot of people there, as early as 7 am! And if you decide to go here anytime after that through sunset, expect the following things:
- A filled up parking lot (waiting to find a spot or never getting one).
- Even if you do get a spot, then having long wait lines to get that popular picture on Devils Bridge (sometimes over an hour).
- As a result, you’ll waste too much time and end up missing out on more awesome nearby hikes (like the Fay Canyon Trail).
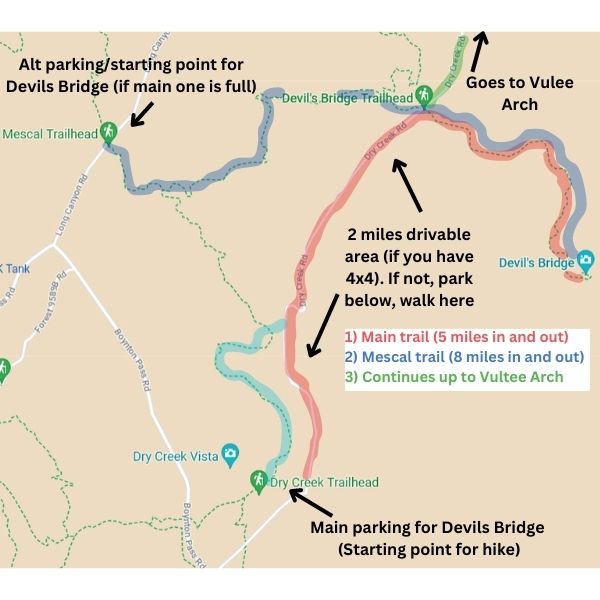
2) Here’s one of the Devil’s Bridge trailhead photos (there’s a catch to that):
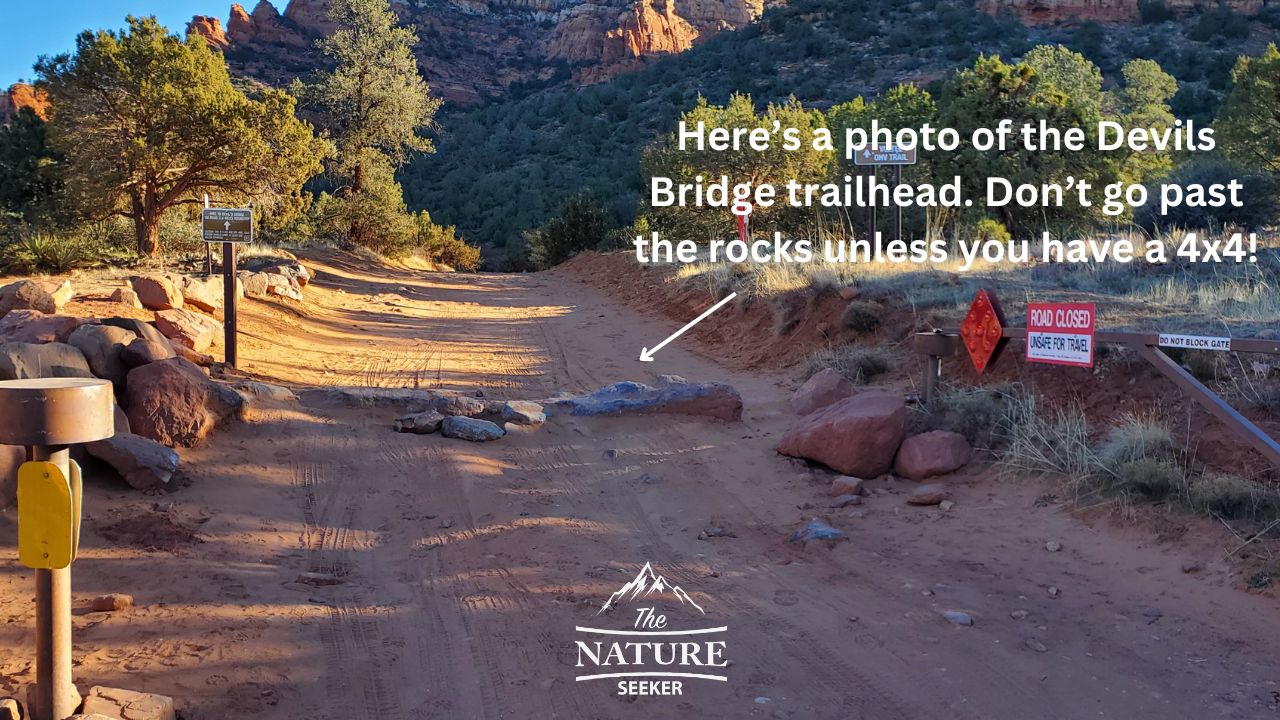
A lot of people ask the following question which is can you drive to Devils Bridge? The answer is no, BUT you can get close and here’s why you need to know about that:
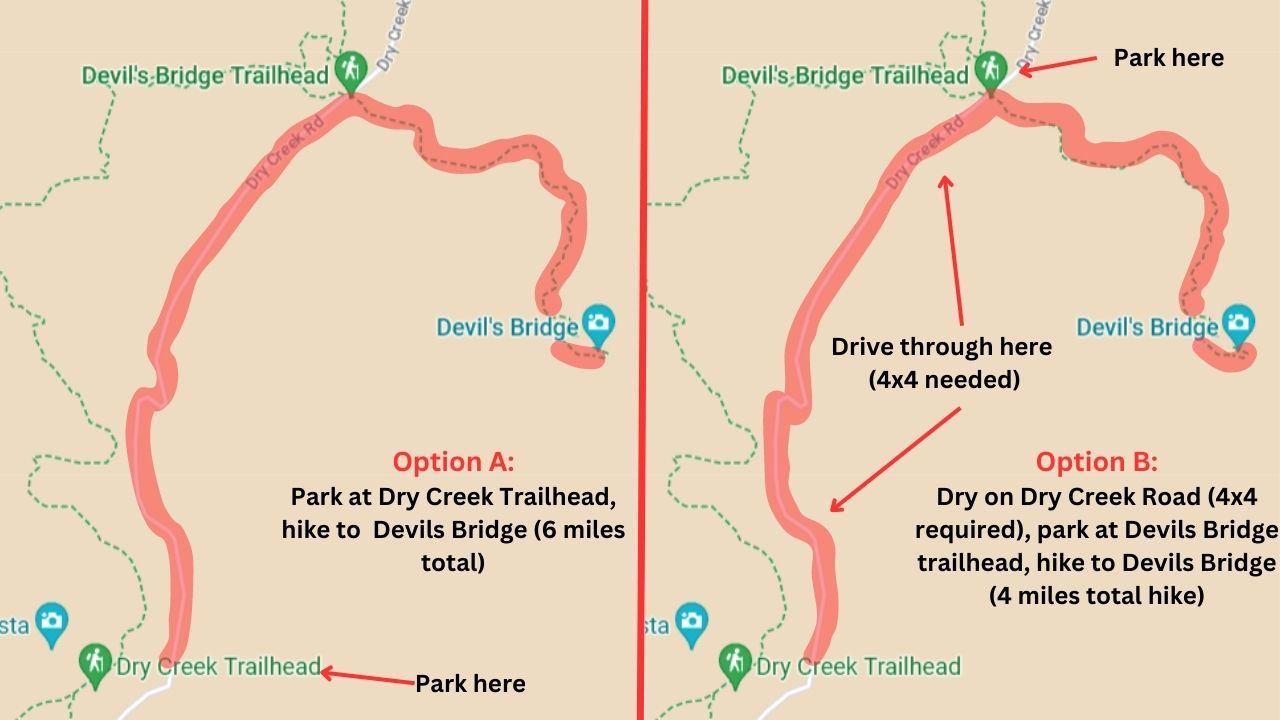
There are 2 popular trailheads to Devils Bridge and here’s what you need to know about each one:
1) Option A, Dry Creek Trailhead (most common, 6 mile hike):
This is where 95% of all people who do the Devils Bridge hike park their car. You will need to walk 2 miles on Dry Creek Road after to reach the Devils Bridge trailhead after which it will be another mile to get there. If the parking lot is full (which happens often), just wait as there’s constantly hikers coming back from the hike and leaving.
2) Option B, the official Devil’s Bridge Sedona Trailhead (4 mile hike):
This is the closest trailhead to Devils Bridge. It is located off Dry Creek Road and you can drive up to it if and only if you have a 4×4 vehicle (do not attempt to risk it in a regular car or even an SUV). Here’s how both options look on a map:
3) If you use option 1, there’s a bonus scenic hike (Dry Creek Trail):
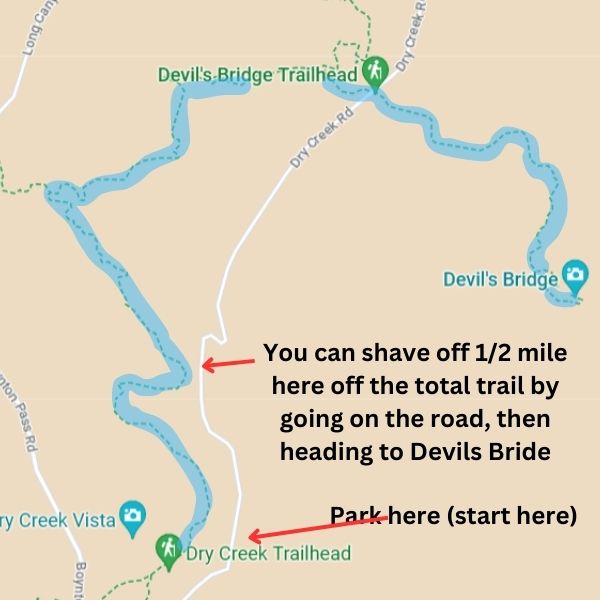
If you park by the official parking lot (option 1, the longer version to Devils Bridge), you can actually take a parallel trail to Devils Bridge (called Dry Creek Trail) which will get you back onto the same road if you did option 2. It’s a bit more scenic to use this trail vs just walking on the rugged road (the views are still nice there, but not as good) and will have you walking through the woods, but there are 2 ways to do it:
- There is a 1 mile option that will take you to Dry Creek Road (1 mile from the Devils Bridge Trailhead).
- The other will be a bit longer (2+ miles) that will take you back to the official trailhead of Devils Bridge.
I personally just jogged the rugged road entirely on the way to Devils Bridge, and did the scenic route on my way back. In my case, I took the first option (1 mile long) and it was a very nice run through the woods with awesome views.
4) Here’s another alternative (less crowded) trail to Devils Bridge Sedona (if the main parking lots are full):
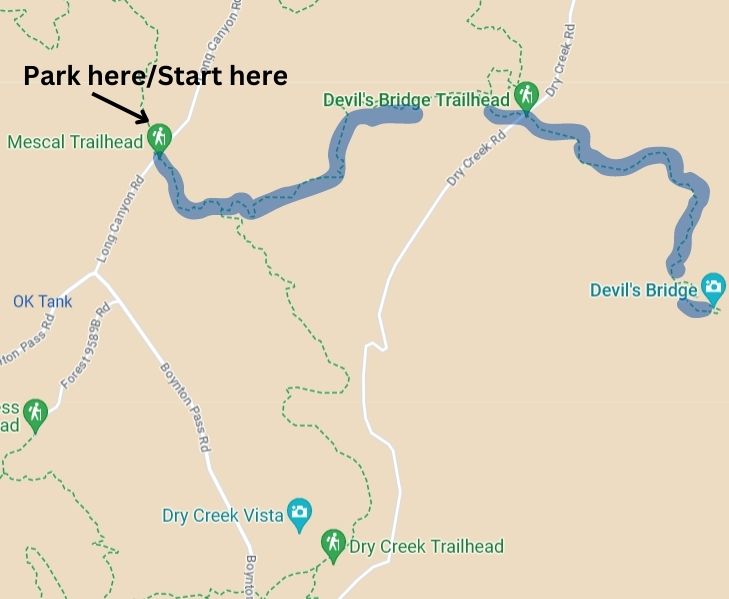
It’s basically a backdoor trail to reach it. From the Mescal trailhead (which you can input on your GPS), it’s a 4 mile trip one way to reach Devils Bridge and it might be worth checking out if the official parking lot is filled up (or perhaps you’ve done the traditional trail before and want to try a new one).
You’ll get awesome views of Sedona from a different angle and yes you will also see signs for Devils Bridge from the Mescal Trailhead too. It’s also a good alternative parking lot in case Dry Creek Parking lot (option 1 to Devils Bridge) is full.
5) 80% of the Devils Bridge trail is pretty easy. The last 20% is tough:
Regardless of which trail you take to reach Devils Bridge, most of the hike is pretty flat and straight forward. When you start getting closer to Devils Bridge, with about 1/2 mile left, that’s when you’ll start to have to do more incline hiking, rock scrambling and more. There’s a steps section of the hike in that last part some people might find a little daunting, but it’s pretty simple to do. Then the last part, which is the walk across Devils Bridge to take your photo is pretty easy to do.
6) You can hike under Devils Bridge if you want:
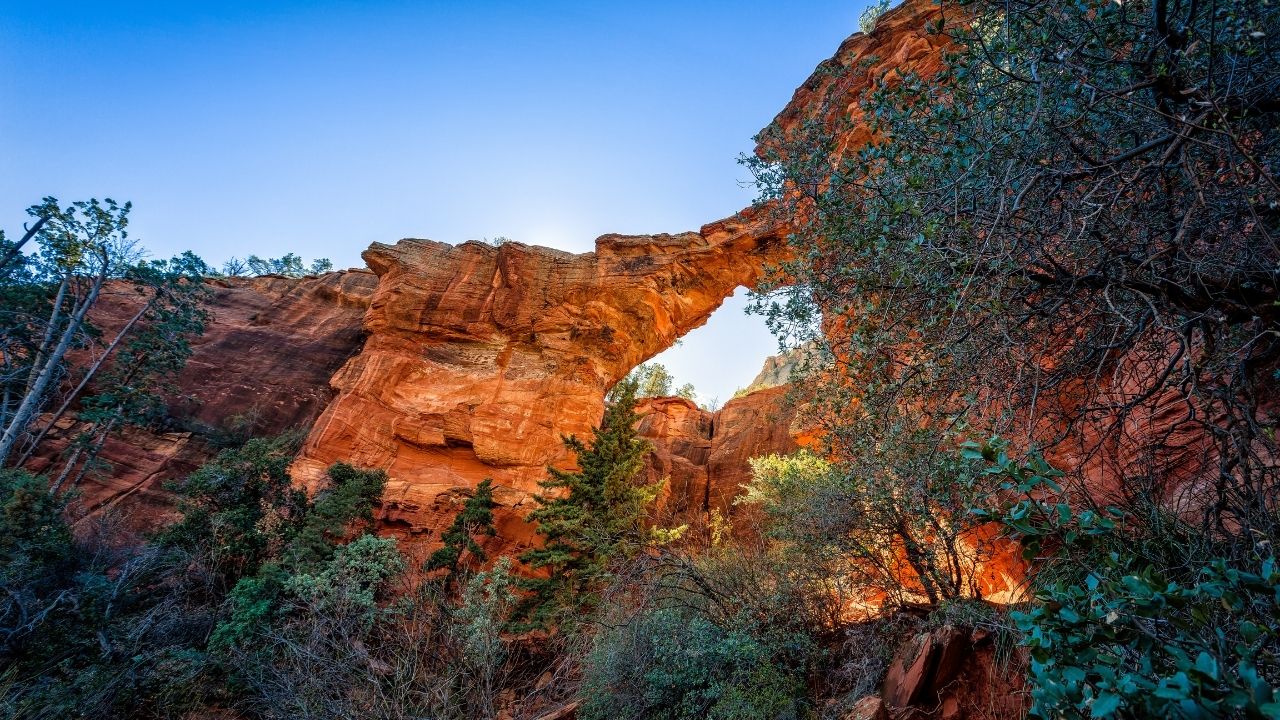
I personally didn’t do it, but the last 1/2 mile bit, you can stray off the main trail and just stay closer to the mountain with which Devils Bridge is attached to. The scenery underneath there isn’t as nice (I suppose that depends on who you ask), but it might be a different angle to explore this place at, and you will also find less crowds there should you find yourself in that position mainly because most people just follow the main trail to the top of it to get that iconic picture.
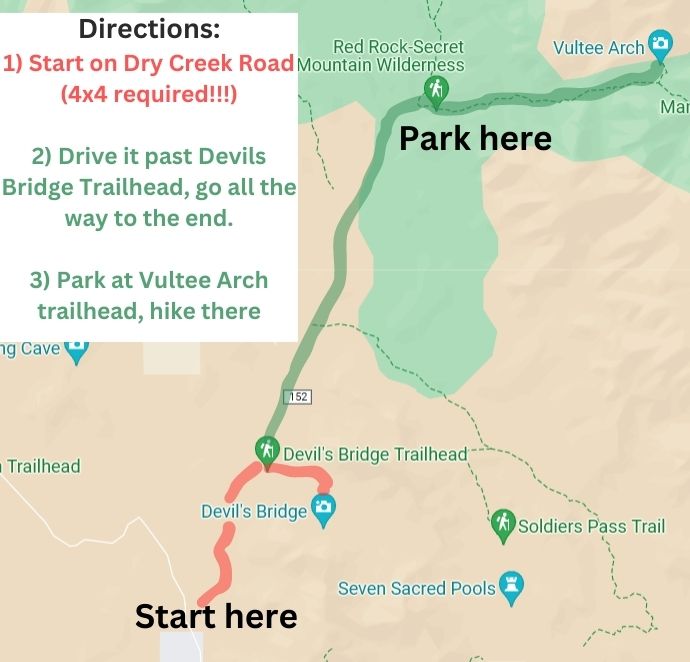
7) Consider hiking to Vultee Arch (close to Devils Arch) as an add on hike:
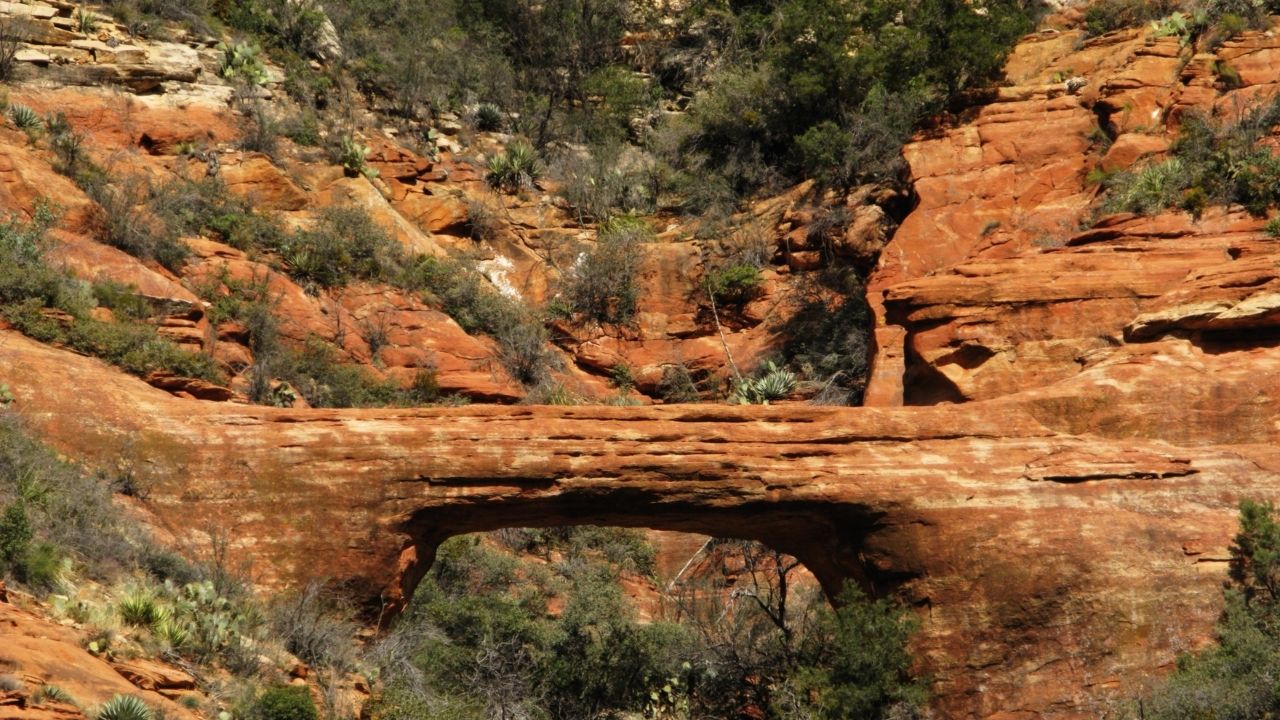
Vultee Arch is actually close to Devils Bridge (maybe about 3-4 miles from it one way) and getting there is pretty easy:
- Walk (or drive) on Dry Creek Road (same classic starting point as earlier).
- You’ll pass the sign to Devils Bridge Trailhead (which takes you to Devils Bridge trailhead).
- You’ll continue on Dry Creek road for another 2-3 miles until it ends and that’s where you’ll see signs for Vultee Arch.
- Park in the area (not many spots available) and from there, it’s about 1-2 miles.
I strongly recommend only doing this hike if you have a 4×4 to drive you to the trailhead, otherwise you’re looking at a 5-6 mile walk on Dry Creek Road and it won’t be fun. There is also an alternate way to get to Vultee Arch (that link shows you how), but it’s a much more difficult hike (2,000+ feet of elevation). Here is a map showing where to go to reach Vultee arch (from Dry Creek Road):
8) You don’t need to bring a lot of stuff to the Devils Bridge trail:
A lot of hikes in Sedona in my opinion require good hiking gear and supplies (especially water), but for Devils Bridge you can get away with wearing regular clothing (cover your head) and sneakers but I would recommend you still buy and wear some good gear if you decide to go. And of course bring at least 3 bottles of water for every person, 4 if you’re doing this hike in the summer (which I honestly do not recommend).
Here is a Devils Bridge Sedona trail map (with all the options above):
This one showcases all of the options and is just easier to understand:
Other questions you’ll likely have about hiking to Devils Bridge in Sedona AZ:
How long does it take to hike Devil’s Bridge in Sedona?
The most popular trail to Devil’s Bridge is about 3-4 miles and it starts at Dry Creek Trailhead. But there is an official Devil’s Bridge Trailhead which requires you use a 4 wheel drive to reach. If you park there, the hike is only 1.5 miles in and out.
Is Devil’s Bridge a hard hike?
Not really. At worst, Devil’s Bridge is a moderate level hike with the last climb up to the area being the hardest part and most people can do it.
How do you get to the Devil’s Bridge in Sedona?
There are 3 popular ways to get to Devil’s Bridge. The first is Dry Creek Trailhead which is most popular. The next one is Mescal trailhead which is less crowded, but a longer hike and the last one is Devil’s Bridge trailhead which is the shortest hike but hardest to reach by car.
Is Devil’s Bridge worth it?
If you can hike to Devil’s Bridge very early, then it’s worth it. Otherwise, you will likely be waiting in long lines when you reach it, and you can use that time to explore many better hikes across Sedona anyway.