How to do The Coyote Gulch Hike in One Day
The Coyote Gulch hike is one of the most famous trails within Grand Staircase Escalante Utah and while most people backpack through it, there’s ways to do a day trip through it too and that’s what I’ll be showing you how to do in this article (there’s 3 ways to do it).
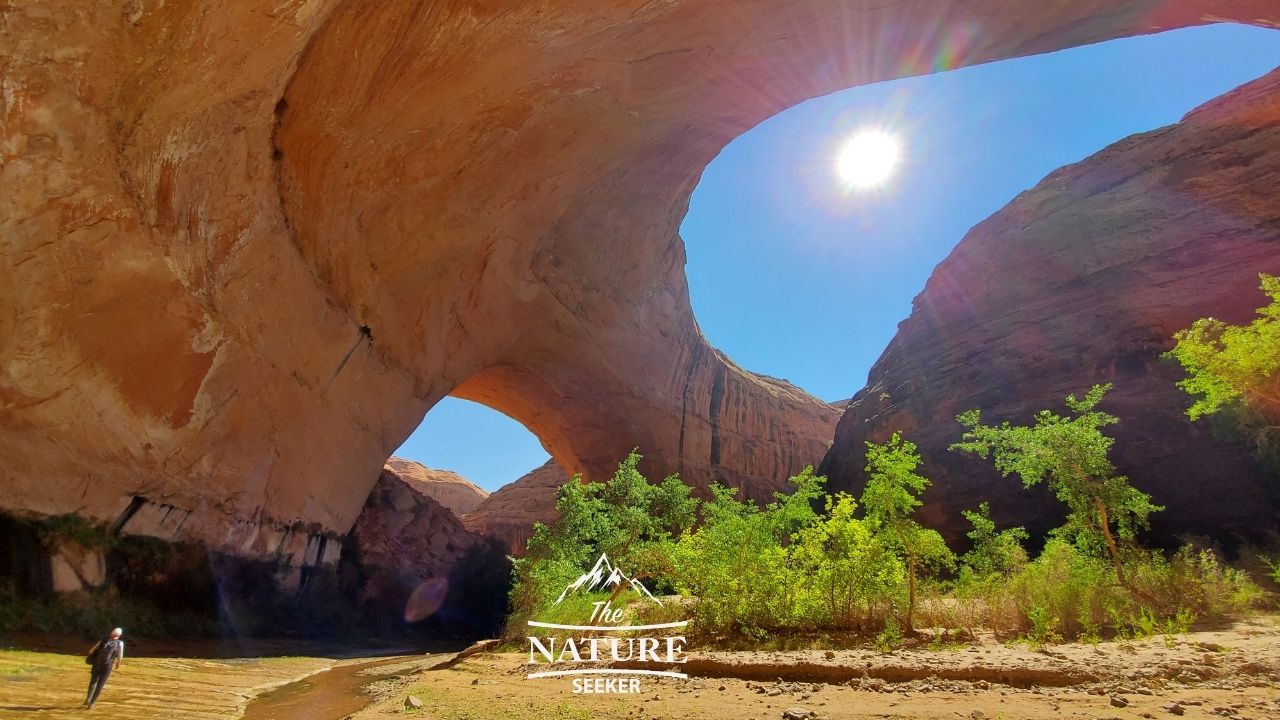
 This is called Jacob Hamlin Arch and if you follow my directions to hike through Coyote Gulch in one day, you will see this spot (and other beautiful areas). In fact, this particular arch (known as Jacob Hamlin, a very famous arches in Utah) is only about 1 mile away from the trailhead where you’ll be parking.
But each of these areas will involve you having to climb in or out of Coyote Gulch, so you may want to bring rope and prepare for pretty strenuous, but very fun hike. While this hike is popular, there’s a good chance you’ll encounter very few people on it (which may be a good thing). Just keep this in mind.
The Sneaker Route is the fastest trail to do a Coyote Gulch day hike. You’ll drive your car very deep into Grand Staircase Estalante, specifically to the Water Tank trailhead and then hike north to the start of the hike into Coyote Gulch. You’ll climb down into the Gulch (through a specific climbing down area near Jacob Hamlin Arch), explore as much of it as possible, then exit out the same exact way you came in, and head back to the same Water Tank trailhead.
This is recommended for beginners (and is the easiest). There are rocky trail markers that lead you to the gulch here (and back). Be careful not to lose sight of them.
The Coyote Gulch Access Point is actually very close to the Sneaker Route (Water Tank trailhead) but with this option:
This is called Jacob Hamlin Arch and if you follow my directions to hike through Coyote Gulch in one day, you will see this spot (and other beautiful areas). In fact, this particular arch (known as Jacob Hamlin, a very famous arches in Utah) is only about 1 mile away from the trailhead where you’ll be parking.
But each of these areas will involve you having to climb in or out of Coyote Gulch, so you may want to bring rope and prepare for pretty strenuous, but very fun hike. While this hike is popular, there’s a good chance you’ll encounter very few people on it (which may be a good thing). Just keep this in mind.
The Sneaker Route is the fastest trail to do a Coyote Gulch day hike. You’ll drive your car very deep into Grand Staircase Estalante, specifically to the Water Tank trailhead and then hike north to the start of the hike into Coyote Gulch. You’ll climb down into the Gulch (through a specific climbing down area near Jacob Hamlin Arch), explore as much of it as possible, then exit out the same exact way you came in, and head back to the same Water Tank trailhead.
This is recommended for beginners (and is the easiest). There are rocky trail markers that lead you to the gulch here (and back). Be careful not to lose sight of them.
The Coyote Gulch Access Point is actually very close to the Sneaker Route (Water Tank trailhead) but with this option:
The 3 trails I’ll talk about to see Coyote Gulch will have you seeing spots like this:
 This is called Jacob Hamlin Arch and if you follow my directions to hike through Coyote Gulch in one day, you will see this spot (and other beautiful areas). In fact, this particular arch (known as Jacob Hamlin, a very famous arches in Utah) is only about 1 mile away from the trailhead where you’ll be parking.
But each of these areas will involve you having to climb in or out of Coyote Gulch, so you may want to bring rope and prepare for pretty strenuous, but very fun hike. While this hike is popular, there’s a good chance you’ll encounter very few people on it (which may be a good thing). Just keep this in mind.
This is called Jacob Hamlin Arch and if you follow my directions to hike through Coyote Gulch in one day, you will see this spot (and other beautiful areas). In fact, this particular arch (known as Jacob Hamlin, a very famous arches in Utah) is only about 1 mile away from the trailhead where you’ll be parking.
But each of these areas will involve you having to climb in or out of Coyote Gulch, so you may want to bring rope and prepare for pretty strenuous, but very fun hike. While this hike is popular, there’s a good chance you’ll encounter very few people on it (which may be a good thing). Just keep this in mind.
Here are the 3 fastest ways to hike through Coyote Gulch in one day:
The good news is that all 3 trails have basically the same trailhead starting point.1) The Sneaker Router aka Water tank trail (up to 10 miles out and back):
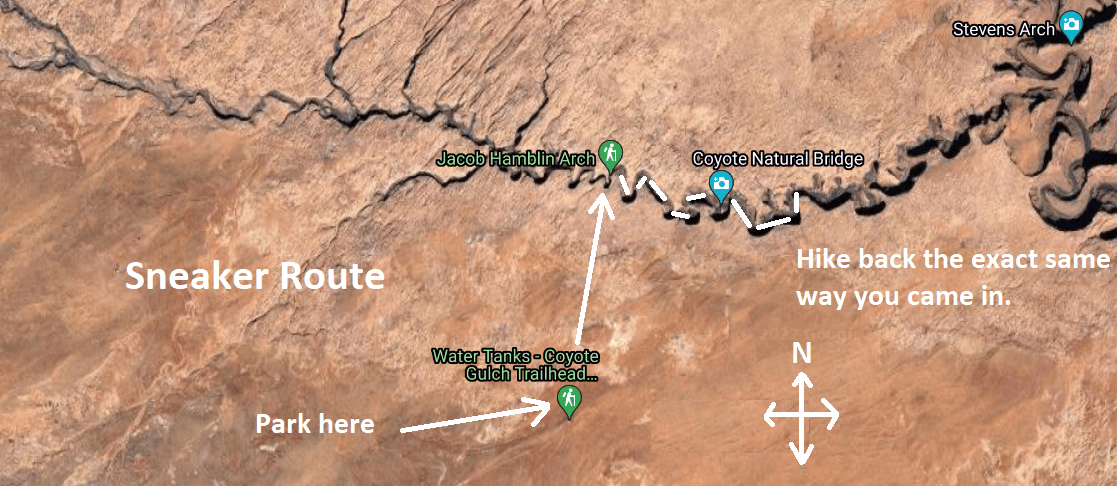 The Sneaker Route is the fastest trail to do a Coyote Gulch day hike. You’ll drive your car very deep into Grand Staircase Estalante, specifically to the Water Tank trailhead and then hike north to the start of the hike into Coyote Gulch. You’ll climb down into the Gulch (through a specific climbing down area near Jacob Hamlin Arch), explore as much of it as possible, then exit out the same exact way you came in, and head back to the same Water Tank trailhead.
This is recommended for beginners (and is the easiest). There are rocky trail markers that lead you to the gulch here (and back). Be careful not to lose sight of them.
The Sneaker Route is the fastest trail to do a Coyote Gulch day hike. You’ll drive your car very deep into Grand Staircase Estalante, specifically to the Water Tank trailhead and then hike north to the start of the hike into Coyote Gulch. You’ll climb down into the Gulch (through a specific climbing down area near Jacob Hamlin Arch), explore as much of it as possible, then exit out the same exact way you came in, and head back to the same Water Tank trailhead.
This is recommended for beginners (and is the easiest). There are rocky trail markers that lead you to the gulch here (and back). Be careful not to lose sight of them.
2) Coyote Gulch Access Point (Also in and out trail, up to 10 miles long):
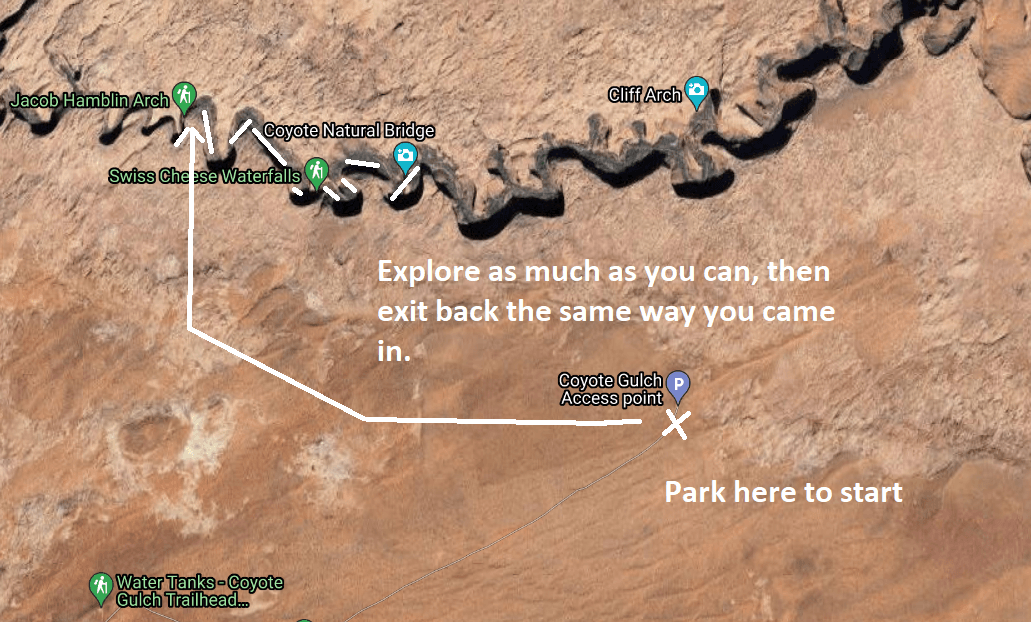 The Coyote Gulch Access Point is actually very close to the Sneaker Route (Water Tank trailhead) but with this option:
- You’ll park your car at Coyote Gulch Access Point.
- You’ll walk westward west north west to the same entrance into the Gulch as with option A (same climbing down spot near Jacob Hamlin Arch).
- You’ll again explore as much of the area as possible.
- You’ll exit out the same way and return back to your car (east south east this time).
3) And finally there’s the Coyote Gulch loop trail (10 miles):
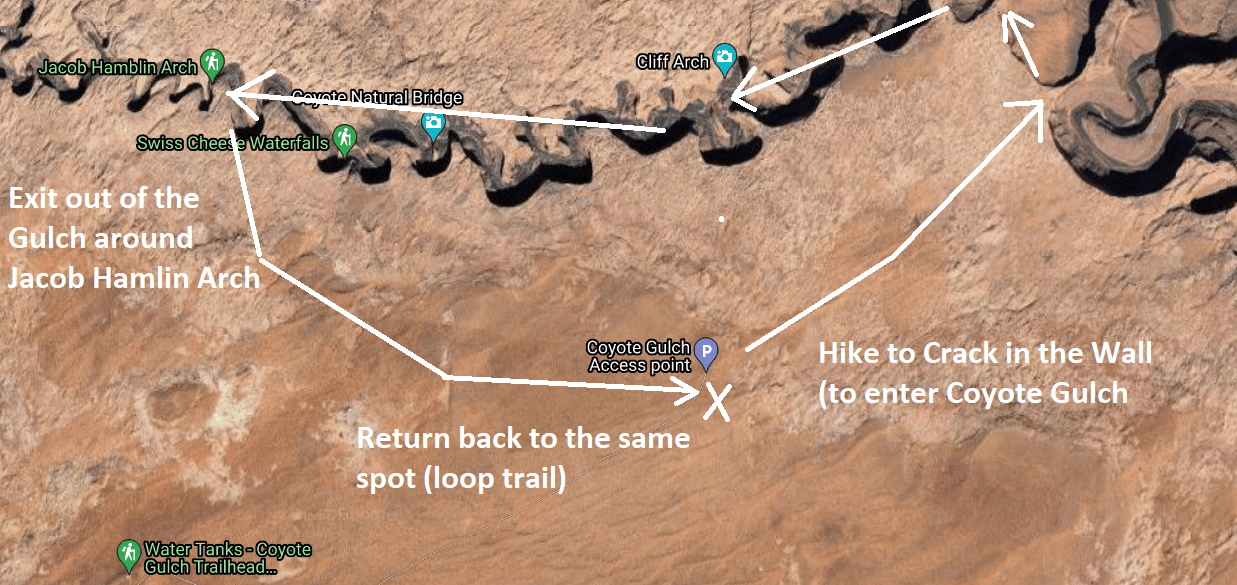
- You basically turn right with option B (Coyote Gulch Access point) and head north east.
- This will get you into Coyote Gulch from the eastern end of it and you will descend into it via an opening called Crack in the Wall.
- You’ll then walk west inside the Gulch, and when you reach Jacob Hamlin Arch, you’ll hike back out and go back to where you came from. It’s a one day loop hike in Coyote Gulch (about 10 miles).
Anyone of these 3 trails will have you see one or more of the following places inside Coyote Gulch:
- Jacob Hamlin Arch.
- Coyote Natural Bridge.
- “Secret” Lagoon.
- Steven’s Arch.
- And more awesome sights.
Here is a video showcasing the 3 day hikes you can do in Coyote Gulch:
9 things you need to know before you do a day hike in Coyote Gulch:
These come from my own experience and VAST research I did on the area to help you avoid all the confusion (which is easy considering how vague the info on this area was when I looked at it online).1) Expect a confusing hike no matter which route you take (if it’s your first time):
It is VERY easy to get lost on these trails because they aren’t paved or marked too well and I promise you, that if you’re not careful, getting lost is likely (it happened to me). There were several moments where we followed footsteps on what we thought was the official trail, only to get lost and have to navigate back. See my post on how to not get lost in the woods to help prepare yourself properly (even though this was a desert hike, the tips still apply). The way around this problem is to use the above map and the GPS on your phone and if you have a compass app and/or real compass, use that too as a plan B. There are surprisingly a few areas in Coyote Gulch which have reception, but even if it does goes out (which it likely will the closer you get to the Gulch, let alone into it), you will still be able to use your GPS compass to navigate yourself to the Gulch (and back once you exit it). Download that map from above and use your Google GPS to help you navigate these trail JUST IN CASE.2) 2 of the trail heads (option A and B) all lead to the same descent area of Coyote Gulch (rope climb may be needed):
2 of the trails take you to the top of the Jacob Hamlin Arch and from the entire Gulch area and the 3rd option will take you the bottom of it to climb out of the Gulch. This area is the only spot where it’s realistically possible to hike down to it. Every other area is just a drop and impossible to hike down through. There’s one problem though:3) You’re going to have to climb down to Coyote Gulch (Near Jacob Hamblin Arch):
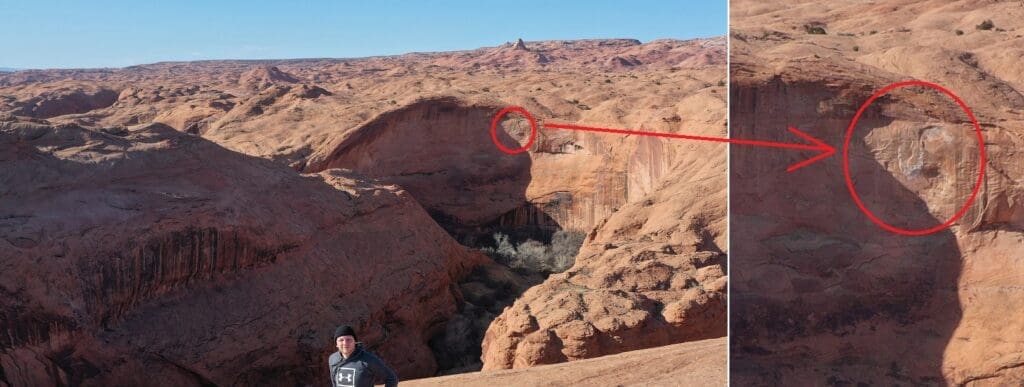
The descent into Coyote Gulch is about 200 feet down and the slope is pretty steep. So if you’re not experienced or are very scared of heights, I’d strongly reconsider trying these 3 trails and just go for the more longer ones like Red Well, Hurricane Wash and Crack in the Wall. But if you are someone who is ready to risk it (and many do), bring at least 200 feet of rope with you to use. There are people who claim that you don’t need the rope to scale down into Coyote Gulch, but everyone I talked to said it is best to have it handy just in case. You will descend into the Gulch from this area and the good news is that finding your way back to this spot is easy, since it’s close to the Jacob Hamlin Arch. You’ll make your way back there when you’re ready to exit and use the rope to climb out there and head back to whichever parking area you started from (back track). In other words, you’ll return back either to the Water Tank trail head or Coyote Gulch Access Point trail.4) If you plan to climb down to Coyote Gulch, look for the white bird symbol on the Gulch:
That symbol will be easy to see when you get to the descent area (it’s how you’ll know where to go down). If you’re going to take one of the 3 trails I showed you, remember, you’ll need to hike down to Jacob Hamlin Arch, but there is a marker that you’ll see on the canyon wall that will show you that you’re in the correct area where you can actually do it and it’s this white symbol some people call a bird, others think it’s just a sign, but here it is, you can judge it for yourself: